June 10,2020
It is unfortunate for our ancestors that they didn’t have the tech-facility that we have now. But, in other sense, they had a life to tell about. Those gigantic cameras with huge fancy flashlights are some to still wonder about.
However, things have changed. We have plenty of options to capture out stills and store them in literally like, wherever we want them to be. Our old generations not only faced the problems of taking their photos but also a way to preserve them for years.
Back then, the quality of the paint was not high like now. The papers were not good enough to hold prints for a long time. Therefore, most of the old printed photos we find in our closet are faded or damaged severely. Some of them are quite hard to recognize.
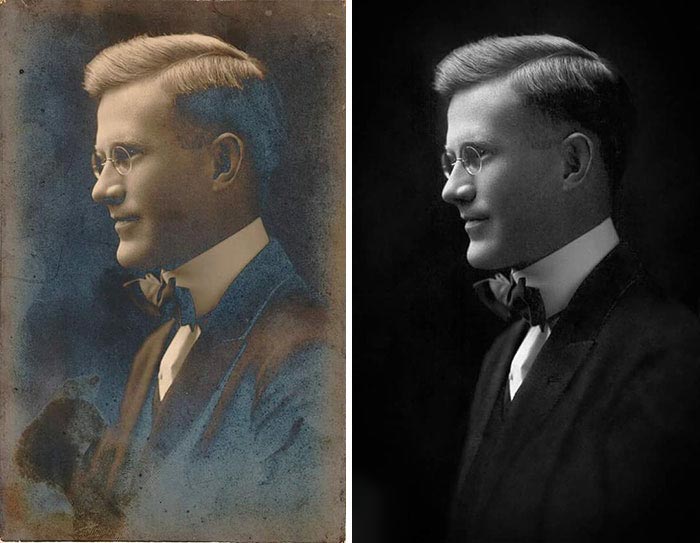
By the way, as I have said before, we are enjoying the benefits of tech-superiority now. And luckily, we have now options to get those photos back in original shape, digitally. Thanks to old photo restoration services. We can even make them better and add color to experience what they might look like in colors.
Old photo restoration in Photoshop is not too simple not too complex. You need to know how to restore old photos on Photoshop, that’s all. No matter how stained or damaged your photos are, or say, you have torn out accidentally, you can restore damaged photos using Photoshop.
However, there are two simple steps for restoring damaged vintage photos. The first one is the conversion of your old photos from analog to digital prints. And the second one is restoring old photos into genuine shape using Photoshop.
 Let’s hear them individually.
1. Converting old printed photos into digital files:
It’s simpler than you think. Just grab the printed version of your old and damaged photo. Put it under a scanner. See the output on the PC screen and save a copy in the drive.
But, always look for a good scanner. The more depth you can obtain from your printed version the better you can determine the details. And it will help through the most accurate old photo restoration process
2.Old photo restoration in Photoshop:
It requires a series of actions to complete the full restoration process. Plus, you need a lot of practice along with patience. A color sensitive eye, as well as creativity, will generate the best outputs.
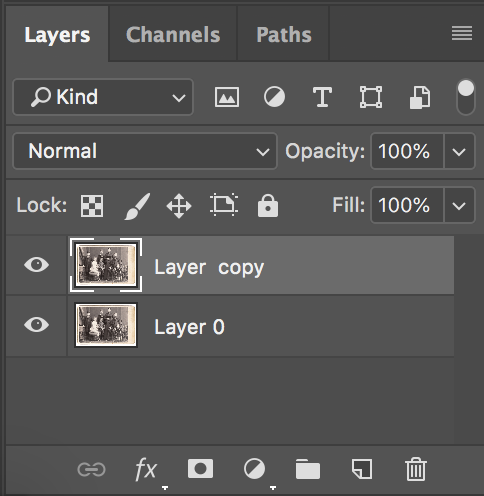
Once you have opened the Photoshop, drag the digital image into it. Make a second copy to make sure you get the primary copy to compare with while you work on the other copy. Now, you are ready to do the post-processing.
Creating a duplicate copy in Photoshop:
To create the second copy, follow the below instructions:
- Click on the Layer in Photoshop’s taskbar.
- Find the ‘Duplicate Layer’ and click on it.
- Once you have a second layer, double-clicking on the name of the working layer to rename it.
Once you have a second copy to work with, look for the unnecessary areas to crop out. Straighten the image if you have it otherwise. And rotate if necessary.

If the image is too bad around the edge and doesn’t include any of your subject’s portions, you can crop it out. To crop an image in Photoshop, follow the below instructions:
- Look to the left and from the toolbox, click on the Crop sign.
- Put your cursor down to the edge and adjust the cropping frame by dragging it.
- Click on the image or press Enter and crop the selected frame.
In case, your image is not straight, which is a scan-flaw; you can straighten it in Photoshop. To do so—
 - Select the Crop sign.
- Take the cursor to the edge and click on the arrow.
- Move it to the left or right until it is straightened.
- Crop it again to have it in this way.
Rotating an image in Photoshop:
To rotate an image in Photoshop, do the following—
- Click on the photo you have in the taskbar.
- Select the Image Rotation and rotate until it is satisfactory.
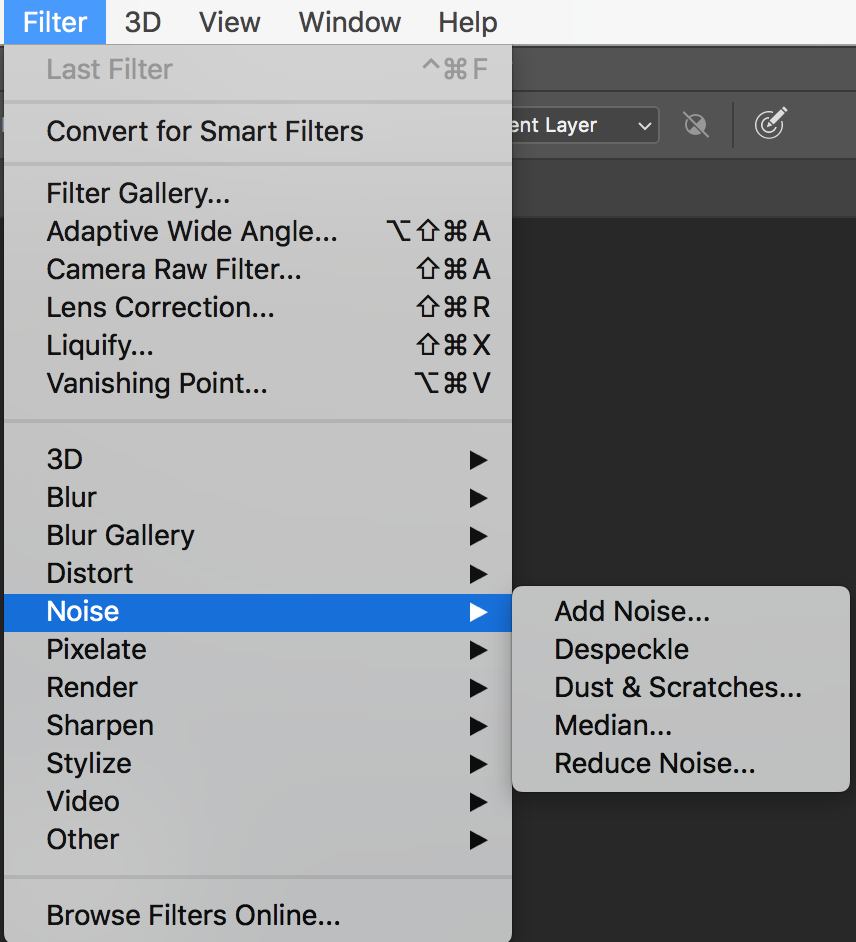
So, your image is now cropped, straightened, and rotated. Now, let’s reduce the noise and advance through the process of old image restoration in Photoshop. Reducing noise will help you eliminate dust and scratches easily and effectively. Now, apply a noise-reduction filter.
Reducing noise from the old photos in Photoshop:
- Look for Filter in the taskbar and click on it.
- You’ll see ‘Noise’ there. Click on it and then on Dust and Scratches.
- Increase the Radius pixels along with Threshold levels from the pop-up window until you get a favorable effect. In any case, be mindful so as not to try too hard to abstain from losing an excess of detail.
- Click on the Noise by going back to the filter and then click Reduce Noise.
- Look into the pop-up window and monitor the preview of your adjustments to make sure you have the right settings.
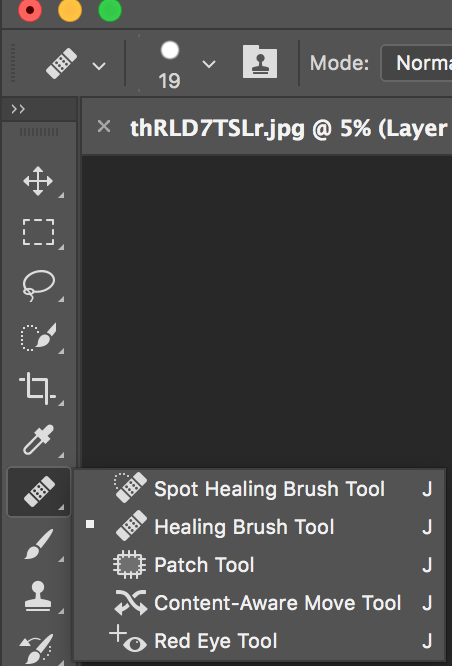
After reducing noise to a certain level, pay attention to the details to make-up damaged parts. The intensity of the task here will depend on the scratches, spots, and stains you have on the images. You will have to use Spot Healing Brush, Patch Tool, and Clone Stamp tool in Photoshop to repair the damage on the old photos.
Zoom in your image as much as possible. It will make your repairing correct and appropriate.


So, you have your photos fixed. No more spots, blurry areas, scratches, and stains. Now, you have to save it if you don’t want to add colors and effects. Old photo colorization requires some additional processes.
To save the file, select File from the taskbar. Find Save As and after sorting out the preferred file format, press Enter to save your new file.
With these simple Photoshop corrections, you can repair your damaged photos. Old photo restoration is easier when you have prior knowledge of Photoshop. However, old photo restoration services can get you perfectly tuned images at sensible costs. You can get the best results from the best vintage photo repair agencies.